ST-LINK — Setup
The Setup options specify the ST-LINK interface.
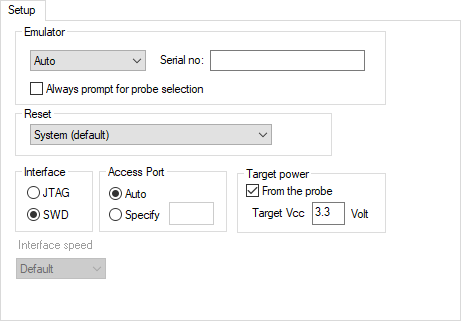
Emulator
Specify the emulator you are using. Choose between Auto (default) where the ST-LINK driver automatically selects the first emulator, or ST-LINK/V1, ST-LINK/V2 or ST-LINK/V3.
- Serial no
If more than one debug probe is connected to the host computer, enter the serial number of the debug probe to identify the correct one.
- Always prompt for probe selection
Makes C-SPY always ask you to confirm which probe to use, if more than one debug probe is connected to the host computer.
Reset
Selects the reset strategy to be used when the debugger starts. The actual reset strategy type number is specified for each available choice. Choose between:
- System (0, default)
Resets the core and peripheral units by setting the
SYSRESETREQbit in theAIRCRregister. Reset vector catch is used for stopping the CPU at the reset vector before the first instruction is executed. Only available for Cortex-M devices.
- Hardware (1)
The probe toggles the
nSRST/nRESETline on the JTAG connector to reset the device. This reset usually also resets the peripheral units. Only available for ST-LINK version 2.
- Connect during reset (2)
ST-LINK connects to the target while keeping the reset pin active (the reset pin is pulled low and remains low while connecting to the target). Only available for ST-LINK version 2 and when debugging Cortex-M devices.
- Core (3)
Resets the core via the
VECTRESET(Cortex-M) orCWRR(Cortex-A) bit—the peripheral units are not affected.
- Software reset (4)
Sets the
PCto program entry address andSPto the initial stack pointer value.
Interface
Selects the communication interface between the ST-LINK debug probe and the target system. Choose between:
- JTAG (default)
Uses the JTAG interface.
- SWD
Uses fewer pins than JTAG.
Access port
Use this option to specify the access port when using devices with more than one core—shared mode debugging. Choose between:
- Auto (default)
A predefined value for the device is used. For most devices, the access port defaults to 0.
- Specify
For devices with more than one core, you can specify the number of the access port on the device you want to connect to,
0-3.
Target power
Select From the probe to specify that the supply voltage to your target device will be supplied by the probe. Use Target Vcc to specify the voltage.
Interfacespeed
Specify the JTAG and SWD communication speed. Choose between:
- Default
Automatically uses the highest possible frequency for reliable operation. This is the only option for ST-LINK version 1.
- n MHz
For ST-LINK version 2 and ST-LINK version 3, sets the JTAG and SWD communication speed to the selected frequency. This option is not available for ST-LINK version 1.
If the selected frequency is not supported by the specified probe, the closest and lowest supported frequency is automatically selected.
If there are JTAG communication problems or problems in writing to target memory (for example, during program download), these problems might be resolved if the speed is set to a lower frequency.